It may not even seem like it, but it’s already Spring. Today we give you tips to give your home a new life and color. We help you to give a new “look” to your home. After all, teaching how to create the most of the prospects of each space and make real estate more attractive is our goal. It might still be cold outside, but the environment will start to heat up as soon as you start renovating your habitat.
We take advantage of the first beautiful mornings to laze at home and enjoy a good breakfast in a flowery, fresh and colorful atmosphere.
1- Flower spreaders

Stationery
- Wooden or bamboo spreaders
- Masking tape or glue-on paper (Décopatch sheet type)
- Varnish glue (Cultura)
- flat brush
Implementation
Surround the handle with masking tape with a floral pattern, brush it with glue varnish. If you have opted for glue-on paper, cut strips and glue them as you go.
Apply a coat of glue varnish as a finish, then let it dry well.
Variation: you can also paint the wooden handles with acrylic paint.
2- Pearl egg cups
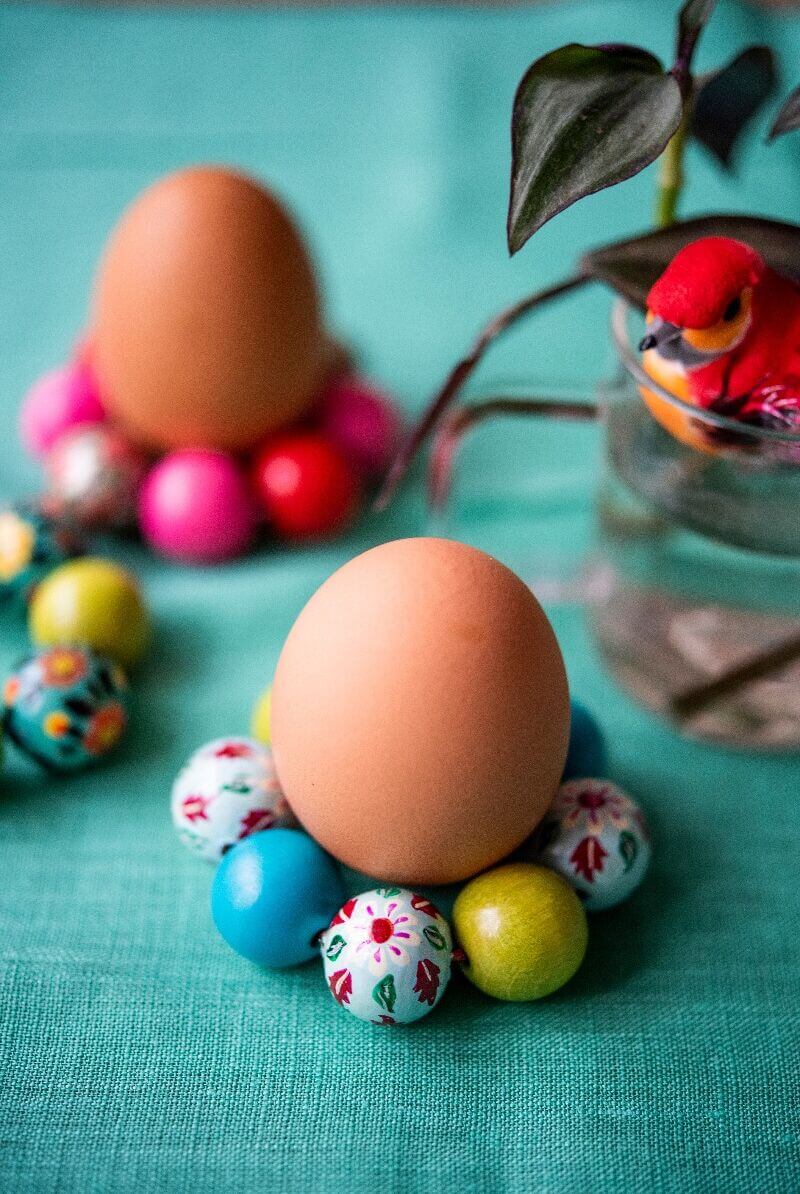
Supplies for one egg cup
- 8 round wooden beads Ø 20 mm, in plain and patterned colors
- 25 cm of imitation snake polyester cord Ø 1.5 mm (all from Perles & Co)
Implementation
Thread the eight beads on the cord, alternating colors, then tie.
3- Air curtain and its flare
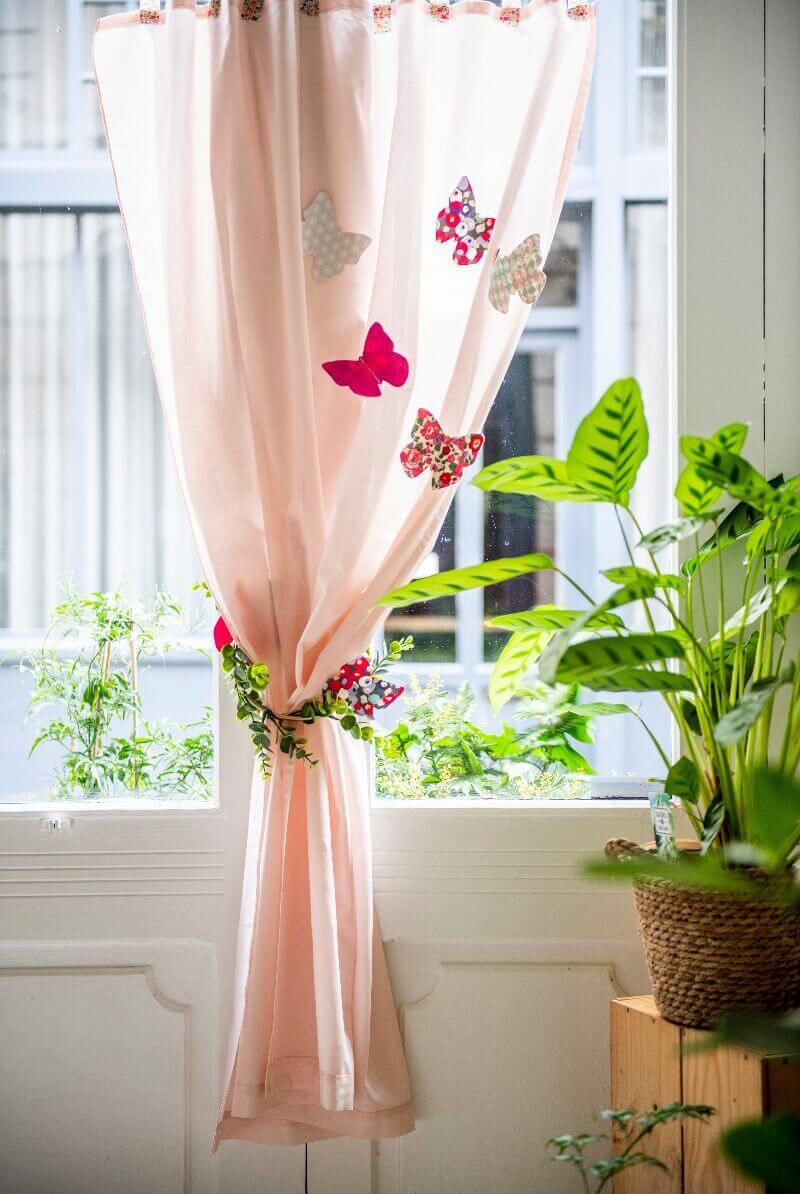
Implementation
Choose colorful and coordinated fabrics. Assemble them two by two with double-sided iron-on placed in the center.
Cut out the butterflies (silhouettes to find on the internet) and sew them on a cotton voile curtain.
For the tieback, divert a tie hanger, wrap a branch of fake ivy or eucalyptus around it, and then attach one or two fabric butterflies.
4- Pastry basket
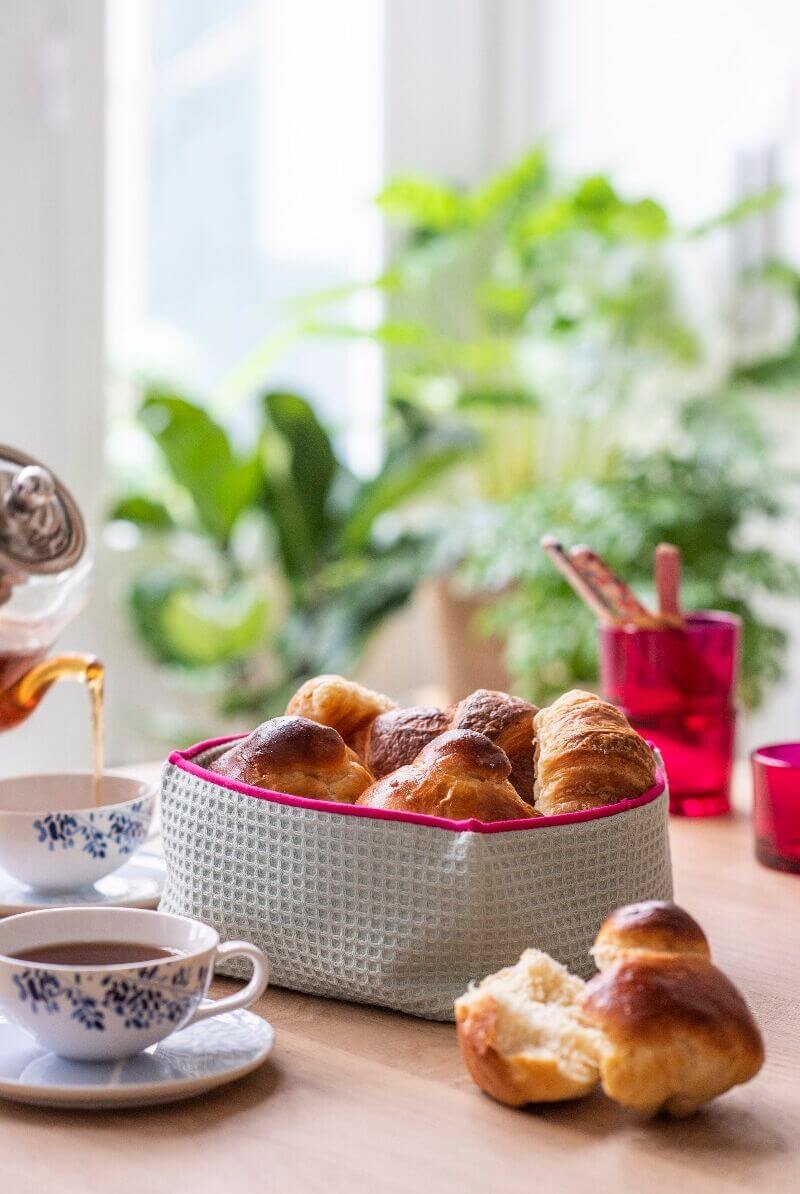
Stationery
- 60 cm of honeycomb cotton, col. Celadon (Mondial Tissus)
- 85 cm of fuchsia piping (Ma Petite Mercerie)
Implementation
Cut out of the cotton 2 strips of 80 x 10 cm and 2 squares of 20 x 20 cm. Pin right sides together with the short sides of the first strip, stitch 1 cm from the edge.
Pin the piping along with the band, then pull lightly on the cord inside to tighten it a little bit. Cut 1 cm. Tuck its end into the opposite end and sew along the entire length as close as possible to the cord. Pin and then sew each strip to one of the two squares, right sides together.
Bring together, right sides together, the two parts of the basket thus obtained, then sew on the seam of the piping already made, leaving a 15 cm slit. Turn the work over through this slit, iron, and close the slip stitch slit.
Mark the corners of the basket by pinching them and holding each fold with blind stitches.
5- Carafe for milk or fruit juice

Stationery
- Clear glass carafe
- Marker (Posca type) with a medium tip, col. green and light green
Implementation
Hold the carafe firmly with one hand and, with the other, draw blades of grass with the green marker: start from the bottom of the carafe and draw slightly wavy lines. Then add dots with light green felt to represent the flowers: one at the top of the strands, then 4 to 5 on either side.
Take inspiration from the “trefoil” pattern of a playing card for the leaves. Let dry.
6- Light kimono
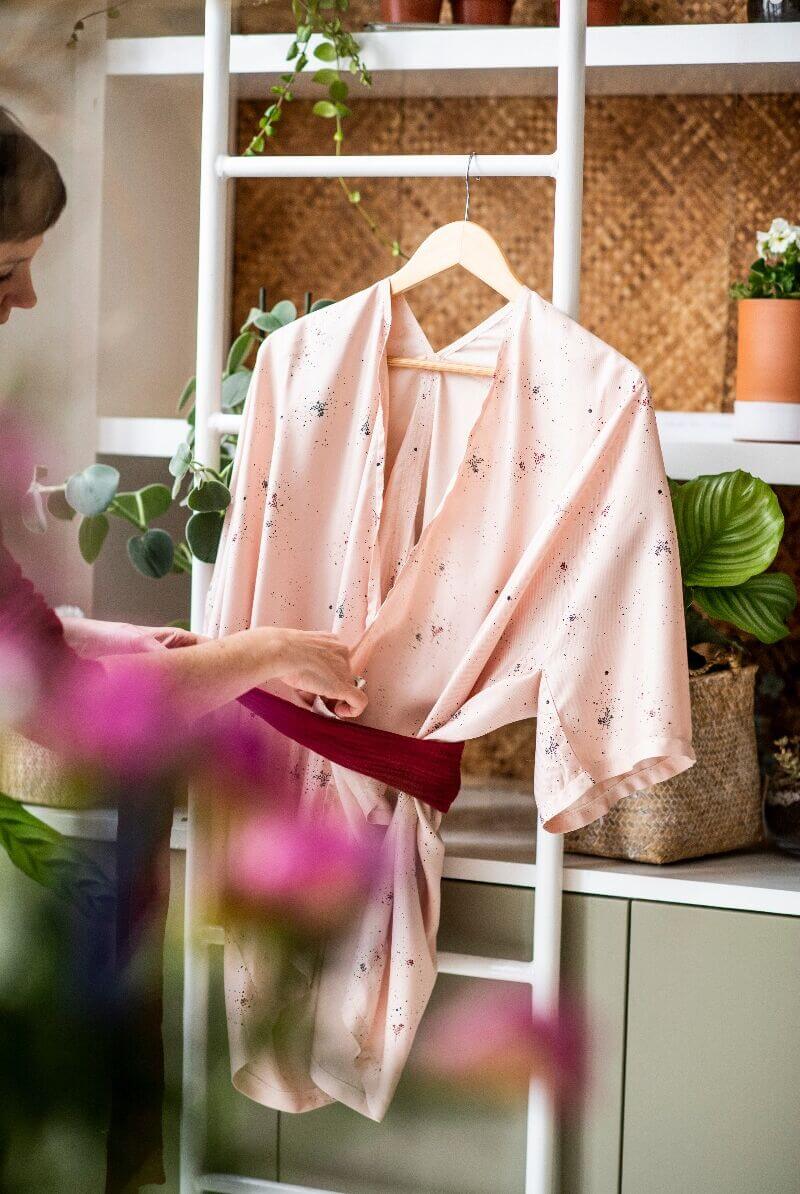
Stationery
- 120 x 150 cm of viscose Twig Night, col. Blush (Atelier Brunette)
- 60 x 130 cm of double cotton gauze, col. garnet (Perles & Co)
- Coordinating sewing threads
- Tailor’s chalk
- Pins
- Scissors
Implementation
Fold the fabric in half, right sides together, then pin the edges. Draw with chalk a vertical line in the middle and, on each side, one rectangle of W 15 x H 50 cm (see diagram). Cut these rectangles, then cut the two layers of fabric along the centerline.
Completely overcast these pieces of fabric. Lay them right sides together and pin them together down the middle. To form the back, sew them 2 cm apart, stopping halfway. Iron this seam open. Along the fronts, sew a 1 cm hem. Stitch the bottom and the sides with a 2 cm hem.
For the belt (W 160 x H 15 cm), cut 2 80 x 30 cm strips in the cotton gauze. Sew them end to end to obtain a length of 160 cm. Fold this strip in half and sew 1 cm from the edges, leaving a slit at one end to turn the belt over. Iron, then close the slip stitch slit.
7- Flickering mirror
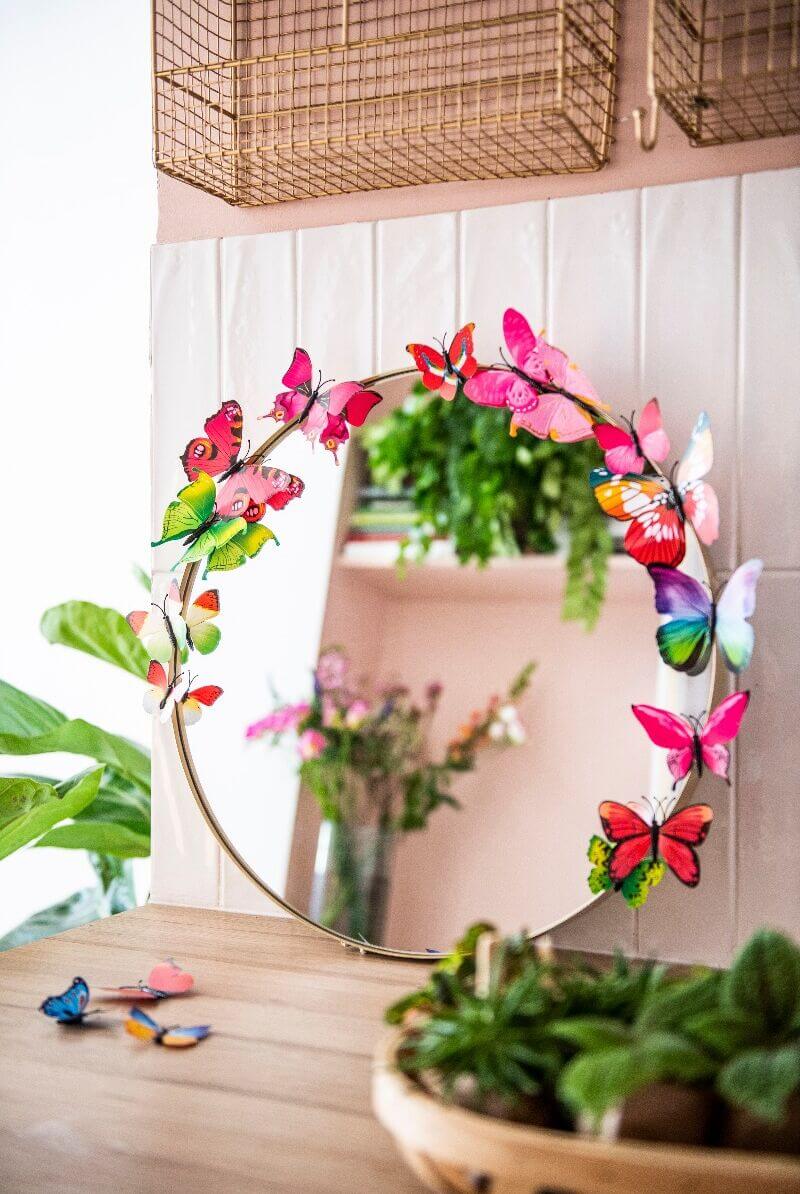
Bring poetry to a simple metal mirror by decorating its perimeter with delicate magnetic paper butterflies (Etsy).
8- Stylish pillows

Stationery
- Old embroidered cotton pillowcases (eBay, garage sales. . .)
- Dye for cotton fabric, col. light pink, fuchsia, and navy (Ideal, in supermarkets)
- 500 g of salt per color and per dye
Implementation
Wash all your pillowcases in the washing machine before dyeing them.
For hand-dyeing:
- Pour 3 liters of hot water, 500 g of salt, and the 2 sachets of dye from the box into a basin.
- Mix well and immerse a pillowcase in it.
- Leave to soak for 20 minutes, stirring regularly.
- Rinse the pillowcase in cold water until the water runs clear—dry flat, away from a heat source.
For machine dyeing: cut an angle on the 2 sachets of dye and place them in the drum of your washing machine with the salt. Add the pillowcase and run a cycle at 30°C, a normal cycle with detergent—dry flat, away from a heat source.
9- Poetic herbarium

Stationery
- Glass and brass wall photo frame (La Redoute, Décoclico. . .)
- dried flowers
- floral glue
- Fine brush
Implementation
Open the frame and clean it with window spray. Imagine a composition with dried flowers, giving free rein to your imagination. Apply, with a brush, tiny dots of glue on the back of the flowers, to hold them in place. Allow drying before closing the frame.
Tip: if you want to make a wreath, draw a circle on a sheet of paper and slide it under the frame, then follow its outline to arrange your flowers.
Tip for drying flowers: harvest flowers along the paths with pruning shears. Take them in moderation so that nature can renew itself. The ideal is to operate early in the morning when the latter is fresh and dry them quickly. Favor plants and foliage with a graphic silhouette. Arrange your harvest between two newspaper pages and put heavy books on top to put pressure on it. After a few weeks, your plants will be ready to be framed.
10- Quilted tote

Stationery
- 110 x 140 cm of cotton fabric with a floral pattern (in haberdashery)
- 110 x 140 cm of fleece
- 110 x 150 cm of resistant plain lining, upholstery type (both Mondial Tissus)
Implementation
Overlap the fleece on the wrong side of the floral fabric, then sew every 4 cm along the entire length. From the quilted fabric obtained and from the lining, cut one strip of 108 x 26 cm (around the bag) and one rectangle of 36 x 18 cm (bottom of the bag).
Sew each strip one after the other, right sides together, on the short side. Pin and sew each of the rectangles with its strip, making sure to place the seam of the edges in the center of the long side of the rectangle.
Cut 2 strips of 70 x 14 cm for the handles in the lining. Fold them in half lengthwise, sew them up and turn them over. Iron them and topstitch on both edges (on the fold and the seam).
Pin the bag and its lining together, right sides together, placing the handles on either side, inside the work between the two layers, and pinning each end 7 cm from the corners. Sew, leaving a 12 cm slit.
Turn everything over, then close the slip stitch slit. Iron and sew all around the bag, 4 cm from the top, to ensure maintenance.
11- Trendy sneakers

Implementation
Using a fine-tipped textile marker (Cultura), draw lines about 6 cm long, slightly curved to represent the branches. On each, make other small strokes. Alternate 2 colors of green. Iron without steam for 5 minutes. Leave to dry for 2 hours.